Everyday Green Juice

IMG_4118

It’s been nearly a month since Eric and I radically shifted our diets and starting juicing heavily. About six weeks ago, my dad watched the documentary Fat, Sick and Nearly Dead and got inspired to do a juice fast to heal himself. Eric and I watched the film also and thought it would be cool to try it with him. My digestive issues had been better after cutting out gluten, but I was curious to see if this kind of thing would mend the rest of the pain and discomfort I was having. Juice fasting isn’t for everyone (and honestly I’m not sure it’s actually for me!) and, of course, you should consult your physician if you’re considering doing something like this. We didn’t do the full-on juice fast, but we have been doing probably a 90% green juice diet with maybe a fully raw light salad or some fresh fruit in the evenings. Probably twice a week we have a meal that is cooked — something that we’ve been craving during the week of juicing and eating raw. Having these meals and knowing that we can have something cooked now and then if we feel like it makes the rest of the time enjoyable and relatively easy to do. We also treat ourselves to some raw meals –either homemade or out at Chaco Canyon Café — which are a nice way to celebrate delicious raw food in the summer time. I cut out caffeine and alcohol about five weeks ago and have maybe had one drink and a couple of cups of green tea since then. Amazingly, my stomach pain has completely resolved itself and I honestly haven’t felt this good in a couple of years.

So I thought I would share my green juice recipe with you. It’s delicious and it tastes so healthy and energizing! Even if you’re not going to shift to raw foods, a green juice in the morning is a great way to start your day. If I’m feeling groggy in the morning, I drink a glass of the green juice and feel energetic and ready to start my day, even without caffeine. While I’m at my desk working during the day, I have a constant glass of green juice that I sip on and refill as needed from a big jar of juice in the fridge.

Notes about ingredients: If possible, organic produce is best, but if you’re going to prioritize and only buy certain items organic, they should be the following: greens, celery, apples. Cucumber and lemons/limes can be purchased non-organic and peeled before using. If you do a little recon to see where the best prices are on these different items, you can save a lot of money that way.

The Recipe

Makes about 64 ounces

1 head of lettuce (romaine is a nice choice)

1 bunch of kale

1/2 bunch of parsley (optional)

4-5 stalks of celery

3 cucumbers, peeled if not organic

2 apples

2-3 lemons or limes, peeled

thumb of ginger

Prepare a big bowl of all of your ingredients, washed and peeled as needed. Start juicing with the greens first. We have a Breville juicer, which works great, but I like to run the pulp through again to get more juice out of it. To do this, once you’re done juicing the greens, dump the pulp from the greens into a large bowl and feed it through the juicer a second time. Then continue on with your other ingredients. Once you’ve juiced all the ingredients, you can run all the pulp through again. You don’t have to re-juice the pulp, but I love how much extra juice you get from this process. Pour your juice into a large glass jar or other container, pour yourself a tall glass, put the rest in the fridge and enjoy!

Follow me on Facebook, Instagram, Pinterest and/or Twitter.

Raw Buckwheat Granola with Homemade Vanilla Hemp Milk

IMG_4112

This weekend, I spent Saturday morning with a friend who I haven’t seen in ages. We went for a lovely walk at Lincoln Park along the water and then stopped in at Chaco Canyon Café in West Seattle on our way home for a little brunch. I’ve been doing a juice fast and/or eating only raw foods for the past couple of weeks, so Chaco Canyon was perfect. I got the Rawnola (raw buckwheat groats with walnuts, shaved coconut, dried apples, dried apricots and housemade hemp milk). It was delicious and I haven’t stopped thinking about it since Saturday.

I happened to have some raw buckwheat groats and some hemp seeds lying around, so I experimented this morning and whipped up a little mid-morning snack. It was pretty darn close to Chaco Canyon’s, but I improvised with the add-ins I had around the house. You can do the same by putting all of your favorite nuts, seeds, dried or fresh fruit in it.

This is a great raw, high protein, nutrient-dense meal and a small bowl is extremely filling. How often do you find that you have really completely chewed your food? I am typically a very fast eater and I’ve been trying to be more mindful lately of really chewing each bite thoroughly and setting my utensil down in between bites. Much better for digestion. This is an excellent meal to practice chewing more mindfully because there are many different textures in this dish and the buckwheat is exceptionally chewy.

I have always been intimidated to make my own nut/seed milks at home. I imagine nut milk bags, straining, etc. Just a lot of effort and mess. But I poked around on the internet to see how to make hemp milk and it looked so ridiculously easy I had to try it. Some recipes suggested straining it after, but I found I didn’t mind it the way it is. The proportions/ingredients below are what I used.

Hemp milk

Makes about 2 cups

2 cups water

1/2 cup raw shelled hemp seeds (I used Manitoba Harvest brand)

2-3 dates (I used 3)

1/2 tsp vanilla

In a blender, combine all ingredients until smooth. Serve immediately, or store in an airtight container for no more than a couple of days in the refrigerator.

Granola

Serves 1

1/2 cup raw buckwheat groats

3 Tbls raw coconut flakes

1 1/2 Tbls raw pumpkin seeds (pepitas)

2 Tbls raw walnuts

1/2 nectarine chopped into pieces

tiny pinch of cinnamon and ground ginger

Stir the buckwheat groats and spices in a bowl to evenly distribute the spices. Add your add-ins (the ones above or whatever tickles your fancy). Pour fresh hemp milk on top and enjoy! Gluten-free, vegan, and raw!

Follow me on Facebook, Instagram, Pinterest and/or Twitter.

2013 ICAS Conference “(De)Colonized Bodies, (De)Colonized Lives” Talk

The Institute for Critical Animal Studies Conference this year was wonderful — I met and reconnected with so many great people and saw some really interesting talks. The ICAS organizers live-streamed all the talks so that people who could not attend the conference in person could still participate (both as speakers and audience members). Dylan Hallingstad O’Brien has done the amazing task of separating out each individual talk and posting the talks online. Thank you so much, Dylan! Anyway, I thought I’d share the video of my talk with you all. And I would also encourage you to check out ICAS’s Youtube site from the conference to see the other talks — there were some really great ones. Such an inspirational weekend and I’m so grateful for all of the activists and scholars who made it possible. The talk is 18 minutes long and here is Part 1:

And here is Part 2 of the talk:

I’d love to hear your thoughts on the subject of animals as part of the colonization process, our own role in this process and the intertwined histories of human and animal colonization processes. Hope everyone is doing well!

Pride Pops (aka Rainbow Fruit Popsicles)

IMG_4079It’s been hot hot hot here in Seattle — not nearly as hot as other parts of the country, but still quite toasty. Record high temps across all of the western US. I wouldn’t want to be in Death Valley right now, that’s for sure. This past weekend was Pride and what better way to celebrate a hot sunny Pride than to kick back and cool off with a rainbow popsicle! I’ve been sitting in front of the fan laboring away at my dissertation writing and this was the perfect project to give me a little break to pour the different layers and then wait while they freeze. I’m already looking forward to dreaming up lots of different homemade popsicle concoctions this summer.

IMG_4075

Rainbow Popsicles

Makes 6 popsicles

LAYER 1:

1 cup fresh strawberries

2 tablespoons coconut milk (canned kind)

splash of water, if needed

LAYER 2:

1 cup frozen mango

1/2 cup orange juice

splash of water, if needed

LAYER 3:

4-5 fresh kiwis, peeled

LAYER 4:

1 cup frozen blueberries

1/4 cup coconut milk (canned kind)

splash of water, if needed

DIRECTIONS: In a blender, combine Layer 1 ingredients and blend until smooth. Pour into popsicle molds until 1/4 full. Place in freezer for an hour. Blend Layer 2 ingredients until slushy and spoon into molds carefully on top of Layer 1, filling the molds so they are half full. Go ahead and do layer 2 and 3, carefully spooning/pouring into the molds so the layers don’t mix.  NOTE: for Layers 2 and 4, the consistency should be slushy and spoonable. This will help prevent mixing with the kiwi layer, which will be more liquid-like. Freeze for several hours, until nicely frozen. I rushed it a bit and ended up with a big dribble of blueberry juice down my front when I ate it.

NOTE: Of course, you can do any variation of fruit and liquids with these popsicles. If you want purely fruit, just add a little water instead of adding coconut milk and OJ to the mix. Popsicle molds are pretty inexpensive and can be a fun summer time splurge, which will save you money in the long term if you are a regular summertime popsicle buyer. Making popsicles instead of buying them can be fun and healthy as a summertime dessert and the variations are endless!

What kind of fruit mixture would you like to see in a homemade popsicle?  

IMG_4074

Summer Salad with Balsamic, Strawberries and Pinenuts

IMG_4040

We’re at the peak of strawberry season right now and I’ve been eating strawberries almost constantly — in my oatmeal, as a snack, as a topping for waffles, and now, in salads. The chickens who live in our backyard absolutely love when I cut the strawberry tops off and take them out for them to enjoy. They’re gone (red parts and green) in just a few minutes. Who doesn’t like a strawberry? Seriously.

This salad is extremely simple and very tasty. I made it last night and put together some little toaster oven gluten free pizzas with mushrooms, onion, artichoke hearts, and capers to go with it. The combination of the pizza and salad was lovely.

The Recipe (rough guidelines)

greens (I used mixed salad greens, but spinach alone would be quite nice, or whatever else you like)

a couple handfuls of strawberries, sliced

a large handful of pinenuts

equal parts balsamic vinegar and olive oil (I usually use slightly less oil than vinegar)

small handful (about 4 leaves) fresh basil, minced

salt and pepper to taste

In a salad bowl, mix up your vinegar and oil and add a pinch of salt and a generous grind of black pepper. Stir in basil and let sit. Toast pinenuts, either on the stovetop in a dry cast iron skillet or in a toaster oven until golden brown. Slice strawberries and add to the salad dressing mixture. Toss to coat. Add the greens and toss. Top with pinenuts.

How are you enjoying strawberries these days?

Vida Vegan Con 2013 Highlights

I’m finally getting around to recapping the highlights of my Vida Vegan Con experience. VVC is a vegan bloggers conference in Portland, OR. Portland is really the perfect location for it because of its vegan mecca status and because it’s generally just such a wonderful, walkable city. I had a great time — balanced between conference going and family time and walking around Portland.

To back up a bit, I was so excited about VVC when I bought my ticket months and months ago, but felt less excited about going to VVC as the weekend approached. I’ve been finding blog writing really hard to keep up with lately because I’m doing *so* much other writing in my life. My days are literally filled with academic writing from the time I get up until I’m burnt out in the afternoon/evenings. And blog writing is the last thing I want to do on top of that. Even though it’s a very different kind of writing from the academic work I’m doing, the idea of sitting at my computer for one second longer than I have to is pretty unappealing. That being said, I think about the blog all the time and wish that I was being better at keeping up with it during this dissertation writing process. But I’m also trying to recognize that dissertation writing is a moment in time and I’ll come back around to being able to write more consistently on the blog when I’ve made some real headway through the dissertation process. We all have our ebbs and flows. I tried to go into the conference with that mindset — not apologetic for my decreased frequency posting, but open to potentially being inspired to blog more regularly again, and trying to be in acceptance of the ebb and flow of life, inspiration and time.

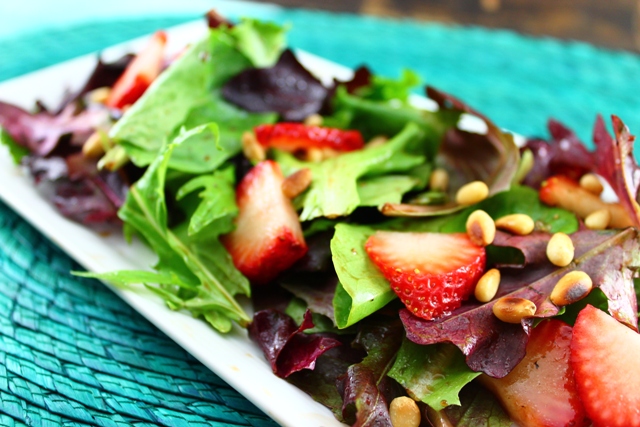
I went to lots of different sessions at VVC, but the ones that I found to be the best were interestingly photography-related. Attending the photography sessions made me think that photography might be a fun non-writing activity to focus on while writing the dissertation.

Food Styling with Hannah Kaminsky

This session by Hannah, of Bitter Sweet Blog, was so interesting. In real time, she styled a plate of pad thai. A lot of the food styling stuff is way beyond my patience — using eyedroppers to apply sauce to a cut-in-half sandwich, using a paint brush to brush soy sauce onto white/tan foods to make their color a little richer, throwing away and replacing wilted greens because the photo shoot has taken so long… I doubt that I’ll ever have the patience for that level of detail and time. I’m much more inclined to set up the shoot quickly (less than 5 minutes), take a bunch of photos (no more than 5 minutes), and EAT! That being said, it was amazing to see the amount of work and attention to detail that goes into a professional photo shoot to make the food look “just so.” One great take-away tip I got from this session was just how important it is to set up your scene well before hand, so that when the food is ready, you just have to add it and take the photos. Food generally starts to look less and less appetizing the longer it’s been sitting around, so timing is key. The other trick I thought I might actually use is to have a spray bottle to spritz water onto some foods to give them that fresh, just picked and washed look (for berries, etc.). I’ve followed Hannah’s blog for a long time, so it was so cool to see her in action!

Advanced Photography with Susan Voisin

This session was awesome. Susan Voisin writes the blog Fat Free Vegan Kitchen  and put together this PDF of her PowerPoint from the conference. So nice to have it all here in one spot.

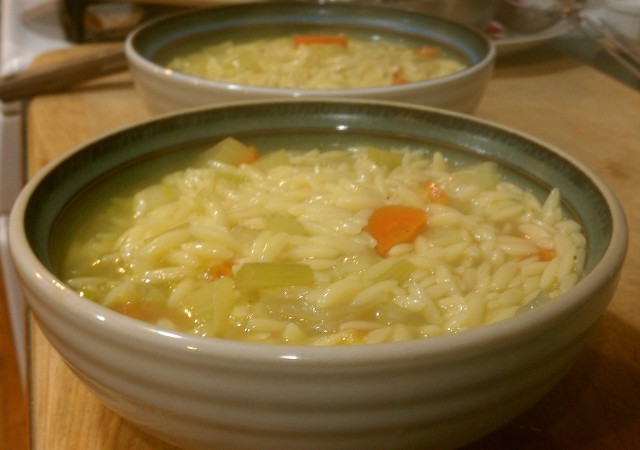
Susan was such an inspiration. She is self-taught, takes wonderful photos, and is such a warm and friendly public speaker. It was an absolute joy to attend her session. And I learned so much, too! The fact that Susan is self-taught was inspiring to many in the room, I think. I know I felt a rush of possibility for my own growth as a photographer when she shared that she had not had formal training. I took a few photography classes back in high school, but that was in the days of dark rooms and I honestly couldn’t tell you a single thing I learned in those high school classes (because I can’t remember, not because they weren’t great!). During her session, she showed us some of her photos when she first started photographing food, and then some of her recent shots. It made me want to look back at some of my first blog photos. Here’s a shot from the very beginning of the blog in 2011, when I was using my Android smartphone to take all the pictures in our kitchen (which has pretty bad lighting) for the blog:

IMAG1183

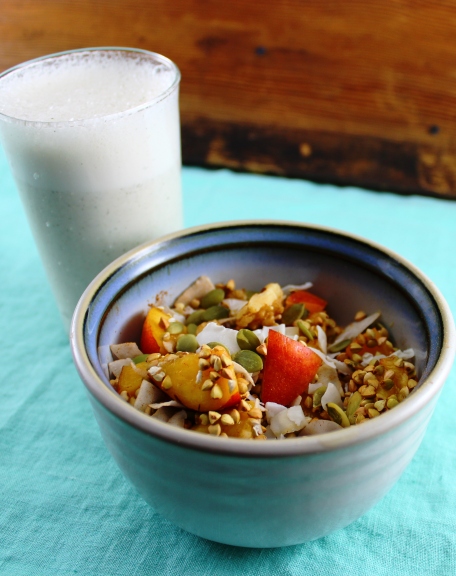
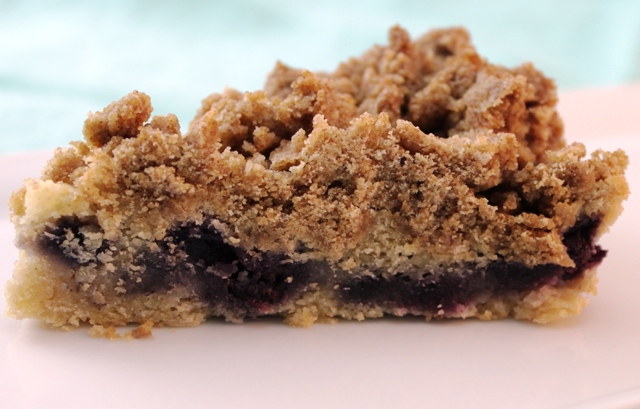
And then there’s this one from last week that I shot with a Canon Rebel T3i in the lightbox:

IMG_4030

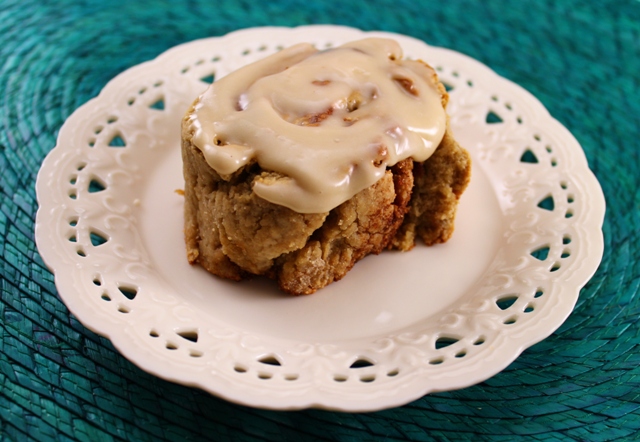
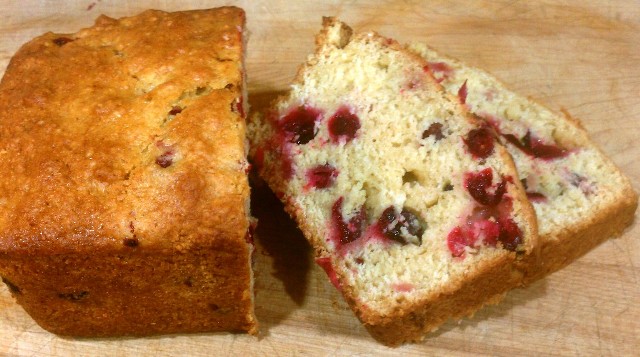
Both foods — the soup and the cinnamon roll — are really monochromatic and not pretty at all on their own, so I thought they might be an interesting comparison. Amazing what a difference the colorful background makes in the cinnamon roll photo, don’t you think? Now here are two that are literally the exact same recipe for Cranberry Orange Bread. First with the phone camera in the kitchen:

IMAG1703

Second, in the lightbox with the Canon:

IMG_3364

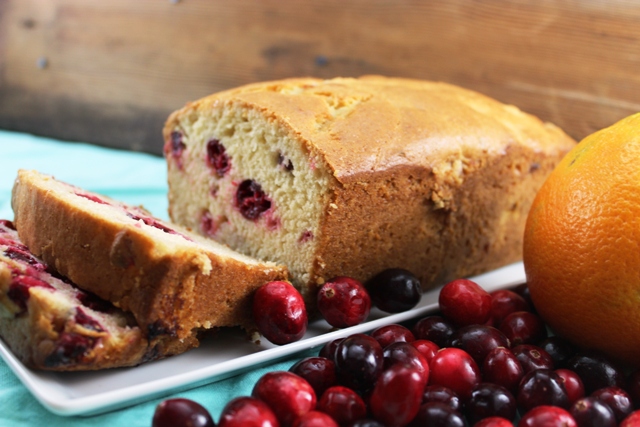
And another way to photograph a loaf of bread which I like a bit better:

IMG_3366

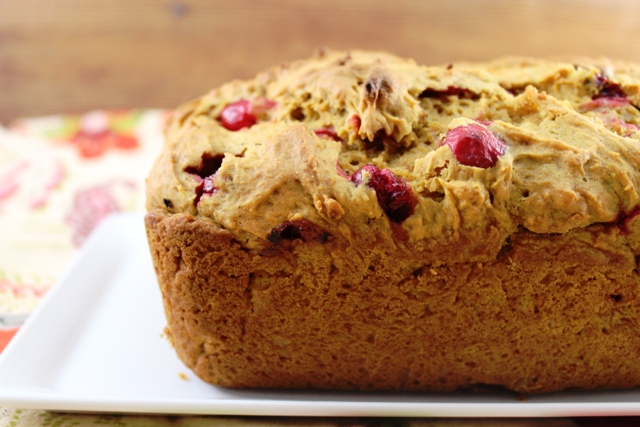
After the photography tips I brought home from VVC, I can see that each of the lightbox/Canon photos still have A LOT of room for improvement, but it’s so fun to look back at the improvement over the last couple of years, just through trial and error, and imagine next steps in exploring food photography.

Expert Corner with Marika Collins and Kate Lewis

The Expert Corner at VVC is such a great thing — basically there was a schedule of individual experts on various subjects available for blocks of time throughout the conference. You could just walk up, sit down, and have one-on-one time to ask questions/talk. I ended up chatting with Marika Collins, whose website is Marika Collins Photography  and her blog is Mad Cap Cupcake, and Kate Lewis, whose website is Kate Lewis Photography and whose blog is Le Chou Sauvage, for probably close to 45 minutes and they were so helpful. I pulled out my camera and they gave me tips on everything from different settings to try, to lighting, to what lens I might want to invest in next (and what was the best deal in terms of what you get for the price). In case you’re interested, for the Canon Rebel T3i, they recommended the Canon 50mm f/1.8 lens. I plan to squirrel that info away for a rainy day! Thanks for the time, info and inspiration, ladies!

Take Away Tips from VVC Photo Sessions

There was so much great information from these various photo experts that I’m not going to recap here, mostly because I have unfortunately lost (hopefully just misplaced) my notebook with my notes in it from VVC. Damn! Anyway, here are the things I remember:

  • Lighting. When I first started the blog, we had these terrible yellowish lights in the kitchen (our kitchen has almost no natural light), so I quickly changed those to full-spectrum daylight energy saving bulbs. Then the next step in lighting was the lightbox, which made huge improvements. What I took away from VVC, though, was to get out of the lightbox and into the natural light. Marika and Kate suggested finding one window (even if it’s in the bedroom or the bathroom) that gets good natural light. Susan showed us her set up, which is a cart on wheels that she positions in front of her dining room window. She added window film sticky stuff from Home Depot to the windows to diffuse the light, but you can use anything from a sheer curtain to something sheer held up in front of the window just for the photo shoot. There’s a great picture of her set up in the PDF I mentioned above. Check it out.
  • Reflectors. To reflect the light coming in the window and get some light coming in on the back of the food, you can position reflectors opposite the window. You can buy silvery reflectors with stands, etc. Or you can just use white foam board propped up near the food.
  • Tripod. I actually already have a tripod (an awesome Goodwill score — $20 for a practically brand-new $200 tripod), but I rarely use it. After VVC, I’m definitely going to pull out the tripod more often and try it out. If you don’t have a tripod, you can improvise with a stack of books, or by resting it on any stable thing you can find.
  • Backgrounds. Backgrounds can really help make a photo special. You should think carefully about what kind of background will work. If the food is really colorful and textured, you might want a much more plain background and, perhaps, a white plate. If the food is monochromatic and lacks interesting texture and color, you might want a plate or background with a colorful print or texture. Backgrounds can include placemats, linens, handmade paper, old fence boards, wood, metal, etc. Susan has a series of wood panels that she has painted and treated to give her lots of options for “table tops.” She also snagged some fence boards when an old wood fence was being torn down. These were especially beautiful with the treated wood. Lots of times, backgrounds can be found for free or at thrift shops or salvage yards for not very much money at all.
  • Photo-a-Day Challenges. Marika and Kate suggested this as a way to improve your photography immensely. Taking a photo every day for a year and posting it as a photo journal sounds like such a fun project. 365 photos in 365 days would really force you to try out new things with the camera and get creative with photo shoots. I would love to try this. Has anyone done one of these challenges before?
  • Props. Along with backgrounds, props can really liven up a photo. Interesting utensils, cake plates, pitchers, etc. Any food related items that make sense with the photo. These can be collected over time at thrift shops, Goodwill, antique shops, etc. Ideally, you would use them for your day-to-day life, too!
  • Storytelling. Your photo should tell a story. What do you want the viewers to feel? What do you want them to take away? Is that piece of cake part of a birthday party or celebration? Is that dinner your 20th anniversary meal, made at home for the person you love? Is that iced tea enjoyed on a lazy summer afternoon in the backyard?
  • Editing. Before the conference, I hadn’t really understood the level of improvement you can get by editing a photo using editing software. It’s amazing! I’m definitely going to consider checking out an editing program like Lightroom or Photoshop.

So that’s my VVC recap for this year. It was great to meet new people, see people whose blogs I follow, and learn new things about taking my food photography to the next level!

Follow me on Facebook, Instagram, Pinterest and/or Twitter.


Cinnamon Rolls (Vegan and Gluten Free)

IMG_4030


First things first — I joined Instagram, and have to say (somewhat embarrassingly) that I’m loving seeing other people’s pictures and sharing some of my own. I’d love it if you wanted to follow me on Instagram! And Facebook, too! ANYWAY, the other day, I saw a post by The Gay Vegans about their favorite cinnamon roll recipe. The cinnamon rolls looked and sounded delicious. But of course I’ve been on this gluten-free train lately and not able to just whip up a batch of gluteny goodness. So I decided to start from their recipe and develop a gluten-free version. I also subbed in coconut oil for the shortening because I’m trying not to use Earth Balance as much these days and made a few other random tweaks as needed to the recipe. In retrospect, it probably would have been good to look up a gluten free cinnamon roll recipe and see if I was missing critical steps/ingredients. But I didn’t think of that at the time. All I could think was, “Those look delicious! I want those, gluten free!” and, less articulately, “CINNAMON ROLLS!!!!!”


The process was a bit haphazard and I had a sinking feeling as they were rising (or not rising as much as I hoped they would) that they were going to be very, very bad. But they actually weren’t bad at all and so I’m sharing this recipe with the following caveats. They’re very soft and kind of doughy — like the whole thing is kind of like the center of a normal cinnamon roll. These are not fluffy — in fact, they are very dense — just a warning. But they’ve maintained their softness on the second day, too. I would definitely recommend making the frosting to go with them. And they really are best right out of the oven.


The Recipe

Makes 8-10 cinnamon rolls


For the Dough:

1 1/2 cups vanilla coconut milk beverage, like So Delicious (or other nondairy milk)

1 1/2 Tbls apple cider vinegar

1/2 cup warm water (110 F)

2 heaping Tbls active dry yeast

2 Tbls coconut oil

1/2 cup vegetable oil

4 1/2 cup GF oat flour (maybe more)

1 tsp salt

1/2 tsp baking soda

1 tsp xanthan gum


For the filling:

1/2 cup coconut oil, melted

1 cup dark brown sugar

1 1/2 tsp cinnamon


For the Frosting:

1/4 cup coconut oil (or vegan margarine)

1/4 cup vegan cream cheese

1/2 tsp vanilla

1 1/2 tsp nondairy milk (I used the vanilla coconut)

1 1/2 cups powdered sugar (vegan)


FOR THE CINNAMON ROLLS: In a saucepan, mix the milk and apple cider vinegar and let stand 10 minutes. In a separate mixing bowl, combine warm water and yeast and let rise for 10 minutes or so. Be careful that the water is not too hot or it will kill the yeast. In the meantime, mix the dry ingredients — flour, salt, baking soda, xanthan gum — in a separate bowl and set aside. Heat the milk and vinegar in the pot until just warm to the touch (again make sure it’s not too hot — it should not be hotter than 110 F). Stir in coconut oil and vegetable oil. Add to the yeast mixture and combine well.  Add in dry mixture 1 cup at a time and stir until fully combined. A nice dough should form. If it’s too wet, you can add more flour to make it less sticky. Dust some oat flour on a dry surface and knead (about 20 times or less). Place in a bowl, cover with a towel, and let rise for 15-20 minutes. While rising, mix the filling ingredients thoroughly together in a bowl. Roll dough out in a large rectangle, about 1/2 inch thick. Spread filling evenly over the dough. Now comes the tricky part. These do not roll as nicely as a gluten dough, so you have to sort of patch and smooth out the dough as you roll it, because it has a tendency to crack. Roll it lengthwise, so you have a big, long roll to cut. When you’ve got it rolled nicely, use a sharp knife to slice the cinnamon rolls (about 1 1/2 inches thick). Place these next to each other in a greased pan and cover with a clean dish towel to let rise for 30 minutes in a warm place. Preheat the oven to 400F and bake for 20-25 minutes (I did 25). Let cool for a few minutes and then cover with frosting and enjoy!


FOR THE FROSTING: Place all ingredients except the sugar in a bowl and blend together with an electric mixer until smooth. Blend in the sugar a half cup at a time until you have a smooth, creamy consistency. Top cinnamon rolls generously with this frosting.

Do you have a vegan, gluten free cinnamon roll recipe you like? I’d love to try it!

May Blooms

IMG_3969

Our garden is a little haven of joy and beauty and pollination right now. I posted a week or two ago pictures of the current garden blooms. This week, we’ve got a whole new array of blooms to celebrate. That orange beauty (above) is a somewhat unusual type of butterfly bush. We planted 3 different types of butterfly bush in the garden last year in the hopes of attracting more pollinators (the other two are later bloomers, so I’ll share pictures of those when they come into bloom). And guess what? The bees and hummingbirds already love it. Another popular feeding spot for the hummingbirds and bees is this fuschia. Every spring/summer, Eric and I treat ourselves to a gorgeous hanging fuschia for the front porch. We have two hanging fuschia elsewhere that actually wintered over really well last year and I’m hoping to winter over this new one we got, too.

IMG_3995

Don’t those blooms make you happy just looking at them? Even fallen on the sidewalk they’re beautiful.

IMG_4003

And they are still beautiful, wilting and dying after they’ve fallen.

IMG_4002

There are also a few different roses in bloom right now. This one:

IMG_3951

And this one comes from the same plant:

IMG_3965


And then this different variety is practically glowing, it’s such a bright pink!

IMG_3982

I’m afraid I kind of missed the peak of these allium for the photo, but they’re still pretty.

IMG_3974

And here’s the butterfly bush, along with an azalea and calla lilies in the background. The callas are pretty stunning — they just keep multiplying every year.

IMG_3957

The irises sure are nice this year, too.

IMG_3980

And then, finally, this one is a California wild lilac, a plant I had never seen until I moved out here to Seattle. One of my favorites.

IMG_4004

That’s it for now! Just a little glimpse into this week’s garden. Hope everyone is having a good week!

Blueberry Coffee Cake (Gluten-Free & Vegan)

IMG_3946

I went back to the naturopath on Monday and was graduated from a no-grains-except-brown-rice diet to a gluten-free diet. This opened up another world of grains and flours and I celebrated this week by experimenting with a gluten-free coffee cake. I have to say, I haven’t had a ton of gluten-free vegan baked goods that are actually good. Gluten-free baking is usually augmented by tons and tons of eggs. My brother- and sister-in-law’s wedding cake, for instance, was gluten-free and was made with 85 eggs. Yikes. Vegan, gluten-free baking requires a good binder and the right combination of gluten-free flours or it comes out pretty sandy. The other trick with GF baking is to keep the ratio of bean flours to a minimum — garbanzo bean flour is a common GF go-to option, and can taste, well, a bit *beany.* Rice flours, corn flours, etc. mixed in can help balance out the flavors. The picture may not be ‘all that’, but this coffee cake turned out to be pretty damn delicious. I’m sure you could sub in wheat flour instead, though I haven’t tried that.

The Recipe

Makes 1 8-inch round cake

Streusel/Crumble Topping:

1/2 cup brown sugar

1/3 cup coconut oil, melted

1 tsp cinnamon

pinch of salt

1 1/3 cup gluten free flour (I used Bob’s Red Mill All-Purpose Flour)

Cake: 

1/2 cup gluten-free flour (like Bob’s Red Mill All-Purpose)

1/2 cup corn flour

1/3 cup granulated sugar

1 Tbls baking powder

1/2 tsp salt

1/4 cup coconut oil, melted

1 1/2 tsp vanilla

1 cup nondairy yogurt (I used vanilla coconut milk yogurt)

1/8 tsp lemon zest (or more to taste)

~1 cup blueberries (fresh or frozen)

Preheat the oven to 325F and grease an 8-inch round cake pan (or a square pan — whatever you’ve got about that size). Make the streusel topping first. In a bowl, combine all streusel ingredients except for the flour. Stir well until fully combined. Stir in the flour and then pack down firmly in the bowl and set aside. This process helps you get nice chunks of crumble topping instead of just dusty crumble on top.

For the cake, mix the flours, baking powder, and salt in a bowl. In a separate bowl, mix the sugar, lemon zest, vanilla, coconut oil, and yogurt. Add the wet ingredients to the dry and stir until fully combined. Stir in the blueberries at the end. Spread batter into the pan. Using a spoon or your fingers, crumble the topping on top, keeping the chunks about 1/2 inch – 3/4 inch in size. Bake for 45-55 minutes — just until a toothpick comes out clean.

Enjoy for dessert or for breakfast with a nice hot cup of coffee or tea. Yum!

Have you had much experience with gluten-free, vegan baking? Any wild successes out there that we should know about in the form of recipes?

Life in the Garden (in Pictures)

IMG_3864

A pair of robins built a nest in our backyard this spring and we have been watching as a baby has hatched and grown up in the nest (no pictures because I didn’t want to get too close). The parents fly out and bring back food for the baby and we’ve been able to see, from a safe distance, meal time and the process of this little guy growing up. This last week, the baby has been learning to fly. I always get so stressed out watching baby birds learning to fly because I’m afraid they’re going to get caught by a cat or hurt themselves or get scooped up by a hawk or taken by a well-meaning-but-misdirected human. With so many odds against them, it’s really amazing that they are able to make it at all. I think this little guy, though, is going to make it. Our backyard is fenced and cats don’t really go back there much, and there are lots of places for birds to hide, so it makes for a pretty safe bird sanctuary. What a treat it’s been to watch this whole process.

I’ve been really trying to stay positive lately. It’s definitely a struggle to stay positive when you’ve opened your heart and mind to the suffering in the world. But I’ve been trying to appreciate the beauty and positive things in the world in the hopes of keeping my stress levels down so that I can ultimately be a more effective advocate for animals and other marginalized groups. Sometimes (okay, maybe most of the time) I forget how important self-care is and how much of a difference it can make to spend some time appreciating all the good things in the world.

I tend to find this kind of positivity most in the natural world. The last week in Seattle has been like middle-of-summer weather — in the 70s and 80s, sunny, light breeze, etc. Our garden has been overwhelmed with blooms and I walk outside and sigh a little from the beauty of the garden. The garden smells sweet, mostly because of these guys:

IMG_3834

I love lilacs.  When we moved in 6+ years ago, one of the first things we did was to plant a tiny lilac bush right out front. Since then, it has grown into quite a *large* lilac bush and gets bigger every year. That’s fine by me though. It sure is pretty. Last fall I mentioned here on the blog that I planted 50 tulip bulbs (pinks and purples with crinkly edges). Miraculously (and I say miraculously because I’ve always had terrible luck planting bulbs), they came up this spring and I’ve been waiting eagerly since I saw their first green shoots pop up in February for this:

IMG_3876

And this:

IMG_3882

And then of course, there’s this one:

IMG_3883

And this one:

IMG_3890

When my mom was here in March, we added to our front garden (dug out some of the grass and added more garden space) and planted these anenomes, among other things:

IMG_3894

These have literally been blooming continuously for about 6 weeks. Amazing. Eric and I did massive gardening and spending time outside this weekend. The animals got lots of time outside, too. We all got lots of Vitamin D (except for Eden who likes to stay inside these days — too many scary noises outside).

IMG_3856

We went to the dog park several days last week where Maizy got to swim and Saoirse got to wander around smelling stuff. And we all spent some time sitting around in the grass. This is Maizy’s “Please won’t you play with me, please…?!” look (it’s hard to get a non-blurry shot of this pose for some reason):

IMG_3908

And here’s Saoirse’s:

IMG_3923

Of course, then they realized they could play with each other.

IMG_3925

I haven’t posted an update on Saoirse in a while. The short of it is that she’s doing really well. She’s adapting more and more to life outside the lab. We’ve been trying to take her out on adventures so she gets used to different places and people and dogs. One of her favorite outings is to Eric’s mom’s house. They have a fenced-in yard and Maizy and Saoirse and Mally, have a great time. She’s also getting to like the dog park more and more. And, as always, she loves Maizy so much.

IMG_3917

These last couple of days have been quite hot and we all have enjoyed cool afternoon snacks of watermelon. Maizy has always loved watermelon and now Saoirse loves it too. It’s hard not to feel happy hanging out with these guys.

What do you do to try to stay positive? How did you all spend the weekend?